“This iPhone was lost and erased. Sign In with the Apple ID used to erase the iPhone” is the message that appears if an iPhone has been locked via iCloud.
A new way to bypass iCloud activation for iOS 8 allows you to unlock any iPhone with an iCloud Activation lock removal even in 2022. Removing the icloud activation lock is helpful when accessing your iPhone “find my iPhone” feature. Similar messages like “Your iPhone is currently linked to Apple ID. Sign in with the Apple ID that has been used to set up this iPhone.”
The guide below gives an in-depth look at How to bypass iCloud activation lock on iOS 8 or later and how to bypass iCloud activation with different iPhone and iPad models. If you want the activation lock iPad bypass, you’ll need to read more below. Similarly, you can find out how do an iPad activation lock bypass code without Apple id.
How to remove activation lock without previous owner?
The removal of icloud activation lock is often necessary The iCloud unlock feature can even help you figure out how to remove your iPhone activation lock without the previous owner. If you are removing activation lock, you should have the iPhone IMEI. We know the iPhone 12 is already out many versions past the iOS 8, and the following steps will also work for the newest iPhones and iPads.
Warning when you remove activation lock on iPhone:
Take extra care with the iCloud activation lock. You can use an iCloud unlock service because many tricks steal your iCloud apple account. removal of
What is the iCloud Activation Lock? How do you Bypass it?
- This iPhone was lost and erased. Sign In with the Apple ID that was used to erase the iPhone
- Your iPhone is currently linked to Apple ID. Sign in with the Apple ID that has been used to set up this iPhone
These are just two of the many messages that can appear if your iOS device has been locked via iCloud. If an iPhone is stolen or lost, the owner can activate an iCloud Lock which prevents any unwanted people from logging into their iPhone without the correct Apple ID login.
Necessary: If you know the Apple ID, make sure to sign in to your apple id account page, which may look like “iforgot.apple id”. If this is not the case (like with a found or stolen iPhone), the guide below will help you bypass the iCloud activation Lock. Removing iCloud activation lock is for another time.
Bypass iCloud Activation Compatible Devices
Below is a complete list of all compatible iPhone devices where the methods below can be used to bypass the Activation Lock on iCloud:
- bypass iPhone 6 iCloud activation Lock
- bypass iPhone 6 Plus iCloud activation lock
- bypass iPhone 5S iCloud Activation Lock
- bypass iPhone 5C iCloud Activation Lock
- bypass iPhone 5 iCloud Activation Lock
- bypass iPhone 4S iCloud Activation Lock
- bypass iPhone 4 iCloud Activation Lock
- bypass iPad Air 2 iCloud Activation Lock
- bypass iPad Air iCloud Activation Lock
- bypass iPad Mini 2 iCloud Activation Lock
- bypass iPad Mini iCloud Activation Lock
- bypass activation lock on iPad 2
Prepare your device to bypass iOS 8 iCloud Activation Lock.
Below is a list of steps to follow to ensure your device is ready to follow the next guide. Keep in mind that most of the time, you can skip these steps as they already apply to your device:
- Have iOS 8, iOS 8.1.1, iOS 8.1.2 or iOS 8.1.3 installed
- Turn on your iPhone
- Make sure the “Hello” message appears in different languages
- Swipe from the left to the right
- Choose your language
- Select your country
- Insert a SIM card (any, it doesn’t have to be the one from the previous owner; however, it is recommended)
- Choose a WiFi network (this is necessary and required to bypass iOS 8 iCloud activation lock)
How to bypass iCloud activation Lock – The ultimate guide
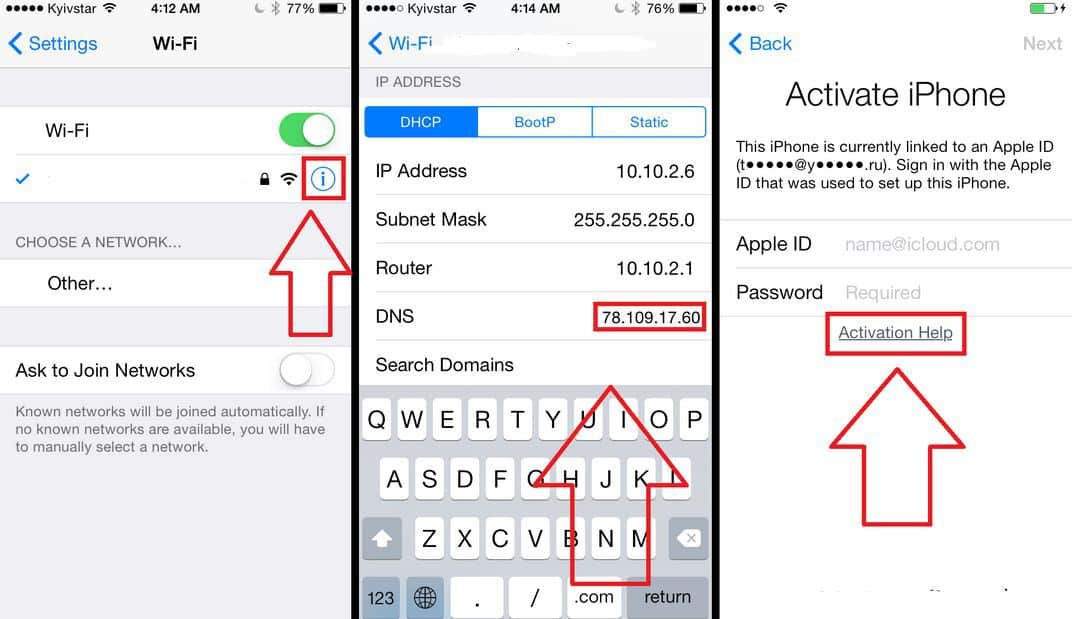
- In the setup process mentioned above, return to Choosing your WiFi
- Set a custom DNS for your router or iPhone to the following: 78.109.17.60
- Choose your home WiFi network
- The go-to to the next window should work as you for the Apple ID
- Hit on the “Activation Help” button
- Go to ‘Applications’ and select ‘Crash Test 1′
- Navigate to WiFi settings once again, click on the ‘i’ and select ‘Manual’ on the ‘HTTP Proxy’ area.
- Add 30 random emojis to the ‘Server’ option
- type ‘8888’ in the ‘Port’ option.
- Click on the “Next” button at the WiFi selection option
- Your iPhone should now freeze and act glitchy. This means that you have done it successfully.
- Now all you have to do is keep sliding to unlock every time the Apple logo appears. (as seen in the video above)
- Once you are at the home screen, make sure to
- force restart by holding Power + Home

How to fix the activation server that cannot be reached?
This error occurs when your ISP has custom DNS servers disabled. You can learn how to fix it by following this guide.


